Monday, October 25, 2010

Leander High Craft Fair

Selah: The dust has just settled from doing our very first market booth show. We both had to devote most of our babies' sleeping hours to gearing up for this, and it basically went off without a hitch, so that was pretty gratifying.


It ended up as somewhat of a coming out party for our joint business of meandher. Prior to this, we each had our separate etsy shops; selahestelle and celenajustine. Celena had even done a booth for the Cherrywood Art Fair (with much success) under her old name. Once we both become stay at home mothers, it began to make much more sense to combine our efforts. Everyone seemed to be drawn in by the idea that we were just starting out and were very complimentary of our efforts.

We didn't make nearly as many sales as we would have liked, but we met so many kind people, have made a few sales since because of the exposure and were invited to some other shows in December, so it was very successful in the connections/networking sense.


I do want to send out a special thank you to all of our friends and family that took the time to come out and see our booth set up (which we worked very hard on). It really meant alot to see familiar faces and feel that support from everyone. We also received many compliments from the public that day which made us feel really great. It was wonderful to have everyone that commented seem to understand the time and love that goes into the things we make and not question their worth in the least.


We have been watching our dear friend, KatinkaPinka, be a success at various booth shows for years now and were really aiming high at creating an atmosphere within our 10 X 10 that was as inviting and pleasant as what she achieves. She is a wonderful role model and advisor on this venture and we can't thank her enough for her example and many tips.

Celena and I have different aesthetics, so setting up a booth atmosphere that made both of us happy was an interesting challenge. We grew up with a wonderful collection of children's books with amazing illustrations. Drawing from our childhood love of these images, we decided that our merchandise and both of our styles could be effectively presented using the amazing artist Trina Schart Hyman's work as inspiration. We also wanted a color scheme that would allow our ornaments to be the focus. The pictures don't really show it, but I think we were successful, mostly thanks to Celena's oddly extensive collection of furniture and decor that was the perfect fit. The only real investment we had to make was buying custom made letters for our shop sign from Mr. Woody (right here in Texas!), which was graciously put together by Celena's handy husband. Celena even had the perfect colors of paint in leftover samples from painting rooms in her home! Kismet!


I did contribute the two lace tablecloths, a vintage quilt and my grandfather's old trunk (which garnered some attention - though not as much as Celena's gorgeous carved wood dressing screen). We had to get creative in hanging our sign on the bleachers behind us, but that was the only adjustment to the space we had to make.


The helpers were so sweet even when the loading process got tough. Arranging everything into Celena's Honda Element was a bit of a puzzle, but it did all fit.
We've applied for another show on December 11th that seems like it might be a better demographic/atmosphere for our particular brand of craftiness, so hopefully we'll be able to report back with more good experiences!


Friday, October 15, 2010

Fun Feet Halloween Activity!

Celena:
Selah and I are always eager to find ways to get creative with the kiddos and a friend or three. We came up with a series of hand/footprint t-shirt ideas for the upcoming holidays and had so much fun with our first one!

Just in time for Halloween!
You should totally try it with your little ones- it would also make an awesome handmade card to send to extended family.

Here is our friend's completed shirt! Her daughter is a ball of energy and she didn't believe that we would get good footprints, but with good timing and speedy optimism, you can do this with pretty much any kid. As with all good crafts, the variation on a common theme is my favorite part. I just love seeing what different things everyone will come up with. ♥ I adore how these yellow toes almost glow. ♥

Have all your supplies ready to go:
white, yellow and orange paints on a tray (we used acrylic because it's what we had and it won't wash out, but fabric paint would be great too)
a few brushes
dish of water
paper towels
dark colored t-shirt(s) with something sturdy and flat inside- we used little plastic trays, but cardboard would be good too
letter stamps or stencils (or if you feel up to hand painting letters, go for it!)
*we also had silver and gold paint for embellishing, as well as some star stamps- you can use rubber stamps if you wash them well, you could carve some potato stamps if you're so inclined*

We set up a playdate with some chums and got to work!

When painting the wee ones feeties it helps to have a positive can-do attitude. If YOU believe that it will go well, they will be much more likely to go along with it. More than one person and possibly some food and/or toys for distraction are also quite helpful. Paint all the colors at once- with calmer more cooperative kids, you can do both feet at one time, but with less patient ones, one at time is best. We were pretty spontaneous with it all, but smocks or old clothes (or no clothes) are probably a good idea for the children and you. Acrylic paint, as I stated, will NOT wash out :)
Your shirts (or whatever fabric you're printing onto) should be pre-washed and dry. Stand the kid up to print their feet- we did this on the tabletop. Wash their feet immediately (especially if using acrylic). We just whisked them over to the nearby sink and sat them on the edge to wash their feet. While it's wet, acrylic washes easily with water from skin and smooth surfaces.

Once you have the feet placed on your shirt you'll need to decide how to lay out your words. We're using rubber letter stamps, here's our good friend getting hers just right:
We all touched up our foot prints a little to make sure each color was bright and opaque enough. Just go slowly and don't get too much paint on your brush at one time and you'll do great. With older or more craftsy children (like the little girl in the last photo) you can let them help out with stamp placement and other decorations on the shirt. Do whatever feels right/looks right to you- bust out some glitter- play with stamping one color over another- just relax and have fun, no matter what- you will be being creative with your child(ren) and that's priceless!
Here are our two little ones (plus a neighbor friend who stopped by) in their completed shirts. Another reason to use acrylic is that it dries quite quickly- this was less than an hour after we painted them. As you can see we have two very different kids and two very different shirts, but they're both adorable and we all had a fantastic time!


Thursday, August 26, 2010

Drop Pull eggs!

Celena: I have always wanted to try my hand at an egg decorating technique known as "drop-pull" and I finally got the chance! My favorite pysanky supplier started carrying stuff for it recently, plus I was lucky enough to already have some key items so I got started right away.
The idea is you have a hotplate type situation with multiple pots of different colored wax. Originally these little pots were actually a muffin tin which was probably heated up over fire or on an old stove and probably needed to be reheated throughout the process. Modern technology has brought us wonderful electric batik tools however so that's not necessary anymore. One modern change that's not so good is that you used to be able to use crayons for this, however, they're mostly made with soy wax now which doesn't stick to eggs so much. *sigh*
You may notice the small tool laying near the wax pots- this is a tool I purchased a long time ago and have used as a paper embosser along with die cut metal stencils which is a great technique. Of course after 10 or so of your 75 wedding invitations you get a little less enamored with it- I speak from personal experience, can you tell? :)
Anywho, I thought that I was going to use a straight pin stuck into a pencil, which is what the old-school drop-pullers use and what I pseudo-jerry-rigged for myself at first:
It actually worked better than you may think, I was able to find a small nail with a head and stick it into one of my dowel pins leftover from my bookshelves and got the hang of it pretty quickly. The nail lost heat rapidly though and I kept heating it up with a candle and ending up with black soot in my wax- no fun.
But once I discovered that the new tools being made for this technique are just little metal balls on the end, I decided to ferret out my old embosser.
Definitely different, but pretty great! I am having loads of fun getting into this new technique and they are much quicker to make than a typical pysanka so that's really nice.
It fills me with glee to watch these boxes fill up with jewel colored eggs that I made with my hands. I love each and every one of them. I wish I had all the time in the world to sit perched at my tiny desk full of waxes and dyes and just create one beautiful egg after another.

Saturday, August 21, 2010

new sketches

Selah: My wrist is crying out that it needs a respite from the long, tensed hours of work on tinies! I still wanted to make things though, so I decided to get started on repurposing some little wooden plaques I got at the goodwill. They had some horrible little wooden children glued to them and were painted an unfavorably bright yellow for my thinking, but already had little hangers and no problems that couldn't be fixed!
Because they are three of a kind, my mind got to thinking about inspirations. I wanted to do some more of my masked ladies because the only two I made have been purchased and with the show so close to Halloween, I thought they needed to make an appearance. After some thought and brainstorming with the husband, I remembered that I used musical names for my discreet femmes (the titles being Sonata and Minuet). I lit upon the idea of sisters and a 3 part harmony. Haven't quite worked out the naming specifics, but was able to get some solid sketching done, thinking about a family of beauties invited to a grand masked ball. Obviously still at the drawing pad, but thought I would let you all know where I'm at.

My wrist is still sore, but just leftover; the drawing is giving it some rest methinks. I've started taking some glucosamine, but it will be many weeks before I'm supposed to feel much difference. Pooh!

Sunday, August 15, 2010

prep work


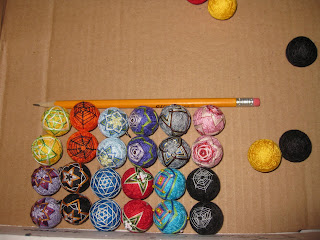
Selah: Spending as much time as I can working towards the show and making sure I have a good amount of merchandise for it. Figuring on my little earrings being an approachable purchase for this type of venue and making them whenever I get the chance (when Dicey is asleep and I'm not in a panic about housework). Have been creating some brand new designs inspired by Halloween, as the show is just prior. Excited about my leetle spider webs, thinking about adding beads to them!
It's always fun to create my own original temari patterns. When I do use someone else's pattern, I obviously make it my own and modify it/can't follow the directions exactly :D; but on the tinies, it's just too hard to measure everything out and really plan a design, so the process is a bit more organic and whimsical than is typical for the larger ornament balls.

It's been an interesting challenge to get used to making these after teaching myself to do the ornament embroidery. The idea came from Celena, who, upon seeing my laborious craft on the larger scale, gleefully declared that she wanted earrings. This was difficult, as it is not only a super small version, but you have to make a matched set! They've ended up being more fun than I expected, but doing the base wrapping for this size is a bit harder on the old paws!
Hopefully they will be a hot item at the show; who wouldn't want a one-of-a-kind pair of hand embroidered earrings? Wish me luck!

Tuesday, August 10, 2010

Pysanky Progress

Celena: My dearest husby Jack just finished making the dye hutch for my egging desk and I couldn't be happier with the finished product! I finally have enough room for all these Colorama dyes,there are over 50!
I am trying to squeeze out all the work time I can to get a good stock built up for our first show which is coming up really soon.

I decided to try a new strategy and am working on three eggs at once all of the same design. I thought my new Texas egg design was a good one to start with and I had a fair amount of the double yolk turkey eggs that I like to use for it. Turkey eggs come with dark brown speckles all over them so they require a bit of hand-sanding before they are suitable for dyeing. Even with thorough sanding they keep a slightly speckled appearance and I think it complements the classic Texas feel that I am striving for with this particular design.

I used SO many different shades of yellow for these roses, I can't wait to melt off the wax and see how they turn out! That is still my absolute favorite part of writing pysanky, melting all the wax off at the end by hand with a candle and slowly revealing the intricate colors beneath.
I still need to complete the blubonnets, some red striping, the navy background for those stars and a pale blue around the roses.
Here's hoping my son's nap remains long like it was today! :)

Friday, August 6, 2010

Our first show!

Celena: We recently heard back about our very first joint craft fair application! We're in and we're very excited.
It's set in late October at Leander High School and is benefitting their baseball department. It's an annual fair, so maybe it will be a recurring gig for us? It's very close to our houses, so it would be great if we were able to do it every year.
Selah's been making more of her adorable and fascinating temari earrings and I need to amp up my egg making! We're still in the fledgling stages so we don't have a set booth arrangement yet and we'll be working hard on that as well.
So much to do- all with little ones in tow. :)


Selah: Not really sure what to prepare for, as we're going into this pretty well blind. Don't know how big a show it will be, or how we will fit in with the other booths/venue. Very excited though for being able to get our feet wet and work out some kinks as we hope this is just the beginning of our show/booth careers. I know we will learn so much with this experience and I'm really pumped about the whole thing. Need to make more stuff though, was pretty dejected when I accidentally squooshed an earring that I had almost finished embroidering! Didn't get as much work done on the car trip as I'd hoped, but now that I'm back from our jaunt to Houston; it's nose-to-the-grindstone time.